Saturday, March 19, 2011

Spring is Almost Here!!!

Hello Friends and Visitors! Spring officially begins next week. Yaaayyyy!!! Of course, that means nothing here in Colorado. We can get snow in April and May. GASP!

Last Wednesday it was 74 degrees and then it snowed almost an inch that evening and was melted by 10 a.m. the next morning. So the saying goes around here, “If you don’t like the weather wait a few hours” it will change. We didn’t see much snow this winter across the front range but it pummeled the higher regions of the Rockies and the rest of the country. I’m glad Spring is just around the corner. I’m looking forward to planting my annuals and garden.

“Photo Frame”
Today I'm entering my project in the Magnolia-licious Highlites Challenge for March with a custom frame I made for my granddaughter, Isabel (Bel). The Challenge is:

“Frame Projects" with a Recipe
Use at least one of each of these:
·       Bling/Pearls
·       Trim/Ribbon
·       Magnolia Image
·       Flowers 

For my Frame Project, I used a piece of 7 inch square double corrugated cardboard and cut the window to fit a small photo giving me plenty of room for embellishments. I covered the cardboard with Bazzill pink cardstock and used my Magnolia, Tilda Lace Doohickey Die to cut a border for the frame.

The inner frame was cut from one of my favorite designer papers from the Chocolat collection by SEI. I cut a window and stitched the outer and inner portion of the DP then adhered it to the frame with foam tape for dimension.

To finish off the back of the frame I cut a piece of Clear Craft Plastic from Grafix to protect the photo and adhered it to the window. Then I cut a piece of cardstock for the pocket  to hold my photo and adhered it over the window.

I colored “Tilda with her Stuffed Animal” from the new "Butterfly Dreams" collection with Copics, cut her out and adhered her to the frame with foam tape. I gave her a bit of Stardust stickles on the lace of her clothing and glossy accents for her shoes. I colored Tilda’s animal as a chocolate poodle to match the color theme. He is just adorable.

Finally, I added some flowers from WOC with a SEI die cut butterfly, a satin bow, pearls in the frame corners and Bel’s photo. Now it's ready to hang in my craftroom.

I enjoyed crafting this project and sharing it with you. The DT for the Challenge really inspired me with all their lovely creations.

‘Til next time…
Hugz,


Sunday, February 27, 2011

Tickled Pink Stamps Challenge #8

Hi Friends! My card today is for Tickled Pink Stamps were they have a new Challenge featuring the theme “TAGS.”
I chose the new Lil All Sorts "Pirate Frankie" for my Belated Birthday card image. And some fun DPs and embellies from SEI’s Travel Collection.
I colored Frankie with Copics and made a tag for my sentiment on my PC.

So if you want to play along with us at Tickled Pink Stamps Challenge head over and check out all the wonderful Pink Ladies creations HERE.

I really enjoyed being the February Pink Guest and I had lots of fun creating projects with these cool stamps. A big “Thank You” goes out to Kellie Winnell for giving me this opportunity.

Until next time...

Hugz,

Tuesday, February 15, 2011

Tickled Pink Blog Hop

Hello Friends and Visitors! Today is the release of the Lil All Sorts Stamp collection hosted by Tickled Pink Stamps. You’ve reached the end of the Blog Hop...that's me...from the lovely Yani. Amy is kicking off the hop so start here.

My card features the sweet “Sad Wilfred.” He is so cute and makes a great image for a Get Well card.
I used a brand new DP collection by SEI called Corinne. They are flowery and bright colors that are perfect for my “Get Well” theme.
Leave a comment for me then hop back over to Tickled Pink Stamps and be sure to leave a comment there for a chance to win some wonderful prizes.

Hugz,

Friday, February 11, 2011

Happy Valentine's Day

Hi everyone! Today as Guest DT for Tickled Pink Stamps I’m sharing a Valentine card I made with Lil All Sorts, Walking Wilfred. He’s an Australian Wombat, so cute and cuddly. He’s also a free DIGI stamp at Tickled Pink during our Blog Hop beginning February 13th so stop by and visit. Check out the lovely Pink Ladies creations of Wilfred HERE.

This card is going to my hubby for Valentine’s day. He is my rock, my life partner, my world. I know he reads my blog so he’s getting an early peak at his card. He just doesn’t know what will accompany it. “Sorry, Dear, I’m not telling.”
My designer papers are from Cloud9Design and Heidi Grace Design. I love the pretty shimmer and glitter on these papers. I distressed the DPs with my Tim Holtz distressing tool then inked them with Chestnut Roan Cat’s Eye. I added a pretty heart ribbon bow and some of my favorite flowers from WOC. The beaded garland was made with red and pink seed beads and 24 gauge wire. I love beaded embellishments because they add movement and interest to my projects.
I colored Wilfred with Copics using a fur coloring technique I learned from the fabulous Copic Instructor, Suzanne Dean. Coloring fur with Copics so that it looks fuzzy can be a bit challenging. So check out her tutorial here and have some fun!
Here’s the inside of my card using some of the same elements from the front. I hand drew a large heart, cut it from Rosebud glimmer cardstock and inked the edges. Then I printed my sentiment from my PC and cut it into strips for a whimsy visual effect.
Here are the Copics I used to color Wilfred.

Supplies
Stamps: Walking Wilfred, Lil All Sorts Collection from Tickled Pink Stamps; Hugs Sentiment, MSE
Pattern Paper: Love Blossoms w/ Glitter, Heidi Grace Designs; Sweetheart Collection, Cloud9Design
Cardstock: Rosebud Metallic, The Paper Co.
Punches/Die cuts: Oval, Spellbinders; Valentine Embossing Folder; Sizzix; Frond Punch, Martha Stewart
Embellishments: Rose buds, Wild Orchid Crafts; Chestnut Roan Ink, ColorBox; Ribbon, Heidi Grace Designs; Pearls, Recollections; Seed Beads, Crafts Etc.

Hope you enjoyed my card and as always thank you for stopping by.

Hugz,

Wednesday, February 9, 2011

Meet "Sir Rupert"

Hello Friends and Visitors! Hope you are having a safe and warm Wednesday. It has been bitter cold here in Colorado the last couple days but we are due for warm weather in the 60s this weekend. Boy, am I looking forward to that! The majority of the snow we received yesterday should be gone.

Today’s project as Guest DT for Tickled Pink Stamps from the "Lil All Sorts" Collection is “Sir Rupert.” Head over to the site for your chance to win this sweet stamp.

I made a simple bookmark that I thought would make a great gift for a teacher. So I created a grad cap to make Rupert look like a scholar. He actually wears a cute little bowler hat. Check out the talented Pink Ladies' projects HERE.
My DPs are from DCWV’s Natural Stack. I tore strips from a sheet of border paper in the stack then distressed the edges with brown ink and adhered them to the tag. I covered the back of the tag with a plaid DP from the stack then I wrapped the tag in Jute twine and tied it in a bow. The sentiment tag was made with my McGill tag punch and my PC.
The back of the bookmark has ribbon sentiments that I printed on American Crafts ribbon with brads on each end. This technique is quite easy. All you need to do is print your sentiments on plain paper using your PC then adhere your ribbon with an adhesive runner such as Tombo. I used my Scotch ATG. I also aligned the ribbon over the printed text with my light box. Then all you do is run it back through your printer and…Voila. Printed text on ribbon. For the final touch I gathered several Earth tone ribbons from my scrap bin for the top of the bookmark.
These are the Copics I used to color Sir Rupert.

Hope you enjoyed my project. Thanks for stopping by.

Hugz,

Monday, February 7, 2011

Tickled Pink Stamps - Emilio

Hello Friends and Visitors! I have some very exciting news for you today. I’ve been invited as Guest Design Team member for Tickled Pink Stamps for the month of February. They have some wonderful products and you can visit them HERE.

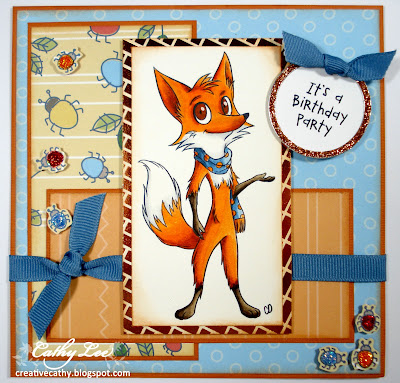
My first card for February as Guest DT is a Birthday Invitation using the new stamp “Emilio.” He so cute don’t you think? I think these stamps make great images for male gender cards ‘cuz, face it girls, sometimes it’s really hard to find just the right image for a boy or man. I thought Emilio would make a great card for a little boy’s Birthday invite. So here is my Emilio all decked out in “doodley-doo Boy” SEI designer papers.
I colored him with Copics and used some Distress ink for added shading and depth. I cut out some of the bugs from my DPs and adhered them with pop-up dots for dimension with a coat of stickles to make them sparkle.
Here’s a close up of the Emilio and the tag. I used a Making Memories metal tag with a sentiment I created on my PC and gave the tag a generous coat of copper stickles to match the mat of my image.
These are the Copics I used to color Emilio.

Supplies
Stamps: Emilio, Tickled Pink Stamps
Pattern Paper: doodley-doo Boy, SEI; Copper Foil, The Natural Stack (DCWV)
Cardstock: doodley-doo Boy, SEI
Embellishments: Copper, Waterfall, Orange & Xmas Red Stickles, Ranger; Tea Dye and Walnut Stain Distress Inks, Ranger; Ribbon, American Crafts;

Come back to see my next project for Tickled Pink Stamps there are some exciting events so visit them often.

Hugz,

Wednesday, January 5, 2011

Mulan Style

Happy New Year Blog Friends and visitors! I hope you had a wonderful holiday season! Ours was very quiet and relaxing. It was just me and my hubby, Bruce. All of our kids spent the holidays with their spouse's in-laws so we desperately missed our grandchildren. But we got to visit with them all for several days over the Thanksgiving Holiday.

This is my first card of the year. I’ve had this Chinese Tilda stamp for several weeks and was dying to get this out and use it. I had the perfect DPs in my paper arsenal. These are from the Ballad of Mulan collection from Piggytales.com and the colors are perfect for the card theme.
I used velvet paper for the ribbon band and the die cut swirls from Marianne Designs. The deep black really stands out don’t you think?
To keep it simple I layered the flowers with a cute button from my Michaels grab bag and the flowers are from American Crafts and Prima. I finished it off with a double bow made with shear ribbon and a pretty velvet button also from Michaels.
These are the Copics I used to color the Tilda.

This card is my submission to the following challenges.
Just Magnolia - Anything Goes

I hope you enjoyed my card...Thanks for stopping by.

Hugz,

Related Posts Plugin for WordPress, Blogger...